wiring harness routing for super a

RTR

Well-known Member
I am wiring my Super A tractor and would like to know how to find out the original routing locations and methods for the wiring harness. Detailed pictures would be ideal if anyone has any, or knows where some can be seen.

I am going to be making my own harness by the way.

Thanks
 
I don't know how the manual is for the SA but the Cub parts manual has, if I remember correctly, some pretty clear diagrams of how the wiring runs. Maybe check into it and see?
 
There are a couple of iffy spots, but the electrical diagrams in both the Owner's Manual and the Parts Catalog show it pretty plainly.
 
(quoted from post at 02:55:16 12/18/10) There are a couple of iffy spots, but the electrical diagrams in both the Owner's Manual and the Parts Catalog show it pretty plainly.

Scotty,

Is there any way you could possbibly direct me to those depictions online, or post them on here?? I only have the Owner's & Parts manuals for the Farmall Cub; which is different. I would like to have a nice copy (preferebly electronic) of the Farmall Super A Manuals; but I don't want to condone the "Manual Selling" on Ebay. Those people basically copy them and "rip other people off". Anyways, let me know if you can help me out with getting those diagrams. THANKS>
 
For whatever reason, I can't link you directly to the diagram, the link fails. BUT, I can link you to CaseIH parts lookup.

On the page in the link, click on the red "right here" in the section to the left of the picture. That will open a new window for the actual lookup.

Type "Farmall" into the search field. Scroll down the results until you get to the SuperA, it will be near the bottom. Open up the Electrical System section. Down near the bottom there are three different diagrams, Items 134, 136 and 140, for different ignitons and lighting systems, that show clips, locations and all.

For the same reasons probably that I can't link them, I've never been able to bookmark anything on there, so you'll have to go in each time.

HTH
CaseIH Parts lookup
 

Thank you soo much Scotty. I didn't even think about going to the CASE/IH parts site. I appreciate your help.

Merry Christmas and Happy Holidays.
 
Yer welcome!

That site is a great resource. I've got all the books on everything I actually own and, though it's not conducinve to building a library, I usually make a point of sending the manuals along with anything I sell.

For whatever reason, I've become the go-to guy in our neighborhood for stuff related to the old machines. If I can take any pride in that distinction, I'll be the first to say it has nothing to do with expertise (apart from being old enough to have cut my teeth on carburetors and point-cap-rotor ignitions -- something alien to the younger guys around here) and more to do with being a packrat and knowing how to find resources.
 
You might be able to help me with my problem I'm having on a Cub I'm working on. It has to do with the ignition system on it. Check out my post. It is near this one on the "modern view" list.
 
I've been watching that develop, as you wree geetin' all manner of good advice. Only other thought I have -- IF static timing is correct, IF cap and rotor are correct for the J4 mag, IF hot spark from center coil wire to ground -- and you'e got weak spark at the plug wires, I'd ask if you have copper-core wires. If not, you should. Those little mags are wonderful contraptions, but their spark will get smothered and just fizzle at the plug end of modern resistor wires.
 

Yes, I am aware of the copper core wires that SHOULD BE USED; but the wires the owner purchased for the tractor are the ones I'm using, and regardless of copper core or not, I would think the tractor should fire, hit, etc. These wires could be copper core, but they do say "High Performance" on them, so prolly not. We have tried other wires though, and still no luck.

Also, it is NOT A MAGNETO, just a plain ole DISTRIBUTOR IGNITION. I never said it was a magneto. I've tried other caps and rotors as well. And yes, we are getting a nice hot spark from coil wire to ground.
 
I'd still be 'spicious of the wires. The resitor wires are made for the high-tension of electronic ignitions, not the old 6/12 volt coils. the "resistor wires" they sold in the days of the coil ignitions to cut down on radio interference (and still delivered a good spark) were a whole different beast from those made for modern ignitions. I'd say it's worth a looksee.
 
(quoted from post at 04:06:55 12/19/10) I'd still be 'spicious of the wires. The resitor wires are made for the high-tension of electronic ignitions, not the old 6/12 volt coils. the "resistor wires" they sold in the days of the coil ignitions to cut down on radio interference (and still delivered a good spark) were a whole different beast from those made for modern ignitions. I'd say it's worth a looksee.

You're right Scotty, but I have only had tractors have a SLIGHT miss when using those. They have always had good spark and cranked great.
 

Scotty (and anyone else),

After studying the diagrams from CASE/IH, I have found a few areas I need to see a closer look at. What I would like to see in these areas is a good picture (of a real tractor) of what I have described. I thought someone out there might have a restored tractor with the wires in the correct spot. Sorry that I'm being such a stickler, but I am that way when it goes to a nice, clean look. HAHA. Let me know what you think, and if you have any questions.
 

Picture:

id50923.jpg
 
I haven't been back o the toher thread to look, but , where/how are you checking for spark from the ends of the plug wires? Start with checking from the end of the wire to the block. If no good there and you're confident of what's coming out of the coil wire, then it's gotta be cap, rotor or wire.

If you're checking the end of the wire to the tip of a threaded in plug and find the spark weak there, then the plug gap or condition should be suspect.
 
For the rear light, give a look at #134. They don't show the chassis, but they list a clip on the forwardd of the two bolts that hold down the starting crang retainer clip, and another on the lower bolt of the rear light mount bracket. The wire wold have to drop down from the forward clip to droop inside the left seat mout, under the PTO lever and back up to the clip on the light bracket. The original style wiring had that heavy woven isulation inside the loom cloth, so it was pretty stiff and stayed in place without flopping around.

For the forward lighting, you see the clip at the air cleaner mount, #21. What isn't obvious, but is listed more plainly on the srawings for the A and B, is there is another clip at the rear generator mount to hold things up at that end. Ahead of that they list one that I've never seen which, from their description, is under the head of the bolt securing the outer end of teh generator brace to the generator body. This would carry the wire for the left headlight. Then all there is is the single round clamp to hold the wire to the left headlight pracket, screw to the rear. For the right headlight, look at Ill #62 under the A. A clip under the bolt on the inner end of the generator brace, another under the timing cover bolt on the right (first one under the governor housing), then the round clamp on the bracket.

I sure couldn't say on the Super A and it's too dark now to go check on my SuperC which has a similar instrument panel, but my best recollection is that all of those wires and harnesses on the left side simply pass out through the lower front left front corner, the harness and wires going forward passing through the clip under the battery bok, and the single wire to the rear light being pulled back to that first clip on on the crank holder.
 
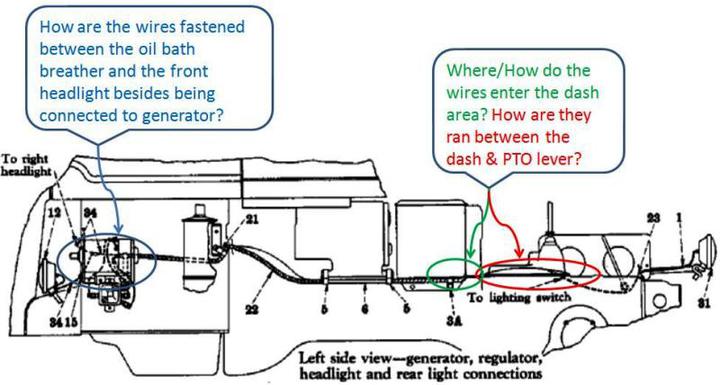
(quoted from post at 08:28:22 12/19/10) For the rear light, give a look at #134. They don't show the chassis, but they list a clip on the forwardd of the two bolts that hold down the starting crang retainer clip, and another on the lower bolt of the rear light mount bracket. The wire wold have to drop down from the forward clip to droop inside the left seat mout, under the PTO lever and back up to the clip on the light bracket. The original style wiring had that heavy woven isulation inside the loom cloth, so it was pretty stiff and stayed in place without flopping around.

For the forward lighting, you see the clip at the air cleaner mount, #21. What isn't obvious, but is listed more plainly on the srawings for the A and B, is there is another clip at the rear generator mount to hold things up at that end. Ahead of that they list one that I've never seen which, from their description, is under the head of the bolt securing the outer end of teh generator brace to the generator body. This would carry the wire for the left headlight. Then all there is is the single round clamp to hold the wire to the left headlight pracket, screw to the rear. For the right headlight, look at Ill #62 under the A. A clip under the bolt on the inner end of the generator brace, another under the timing cover bolt on the right (first one under the governor housing), then the round clamp on the bracket.

I sure couldn't say on the Super A and it's too dark now to go check on my SuperC which has a similar instrument panel, but my best recollection is that all of those wires and harnesses on the left side simply pass out through the lower front left front corner, the harness and wires going forward passing through the clip under the battery bok, and the single wire to the rear light being pulled back to that first clip on on the crank holder.

Thanks again Scotty. That helps me out alot. Since my tractor has some of the clips/hooks missing; I was just needing to find out where they were supposed to be located. I think I have some extra ones in the shop, so that shouldn't be a problem.
 
(quoted from post at 23:28:22 12/18/10) the single wire to the rear light being pulled back to that first clip on on the crank holder.
I don't believe that is correct. I know that on the A and B the rear light wire drops down from the instrument panel and goes along the left side of the transmisison cover (clip at the middle bolt) and along the back edge of the cover (clip at the right bolt). It then turns back to go to the light (with no more clips). I believe the Super A wire follows the same basic path. The crank holder is on the right side of the transmission cover.
 
That was my first instinct, Jim. The routing for the rear light wire on the As and Bs was just as you describe, and looks nice all laid in place, and I can't think of a rason it wouldn't work as well and nicelly on the Super A.

For whatever reason, they changed it on the SuperA, at least as shown in the parts description and the drawing RTR posted.

Your observation makes me want to rethink a little as to how that wire would come out of the control panel. It would make more sense on the SuperA, if it's routed as the drawing shows, for it to come out of the right front corner and then be routed back, with the other harnesses running out the left front corner.
 
One thing about the Super A drawing, the view is from the left side. Anywhere the wire is hidden behind another part, it is shown as a dotted line. Look at the wires behind the generator and air cleaner. Note that the rear light wire is drawn solid along the transmission cover then goes dotted from there to the light bracket, then goes solid again. I interpret that as the wire crossing from left to right at the point it goes dotted at the rear of the transmisison cover..
 
I'd agree if the parts listing didn't list the clip for that wire as being under one of the bolts on the crank retainer clip, which is on the right.
 
I pulled out an OLD parts catalog that has a better print quality than what we have with the image already posted in this thread. In that copy, the rear light wire is clearly a dotted line for the full length. So I'm going to change over to the routing you said. The Super A routing was different than on the A.
 

We sell tractor parts! We have the parts you need to repair your tractor - the right parts. Our low prices and years of research make us your best choice when you need parts. Shop Online Today.

Back
Top