Three Point Hitch Dimentions

Lanse

Well-known Member
Hey yall...

Well, I've been trying to build a few things here to make some money... I'm making a few carry-alls and a couple fence unrollers, plus a few other odd things.

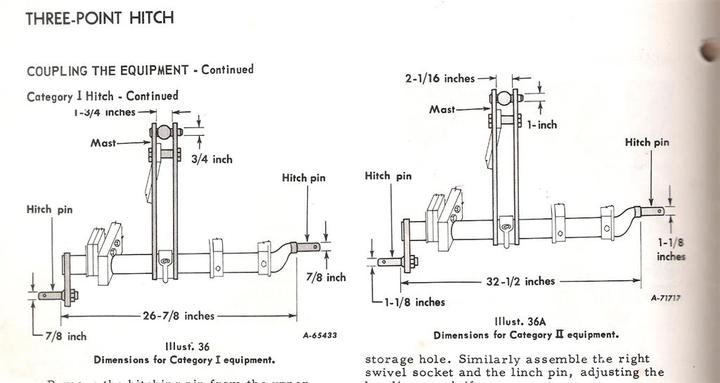
I'm trying to figure out how high to set the lower link pins, on the hitch parts of these things. If I set them too low, then someones going to have a heck of a time lifting the implement to get it hitched up. And, I need to know how far from the lower link pins I should put the holes for the top link pin to go through. I haven't found anything too useful with google, except the pins should be 24" apart, which I already figured out, and I don't have a handy tractor to go and measure on...

IMG_1799.jpg


IMG_1791.jpg


IMG_1789.jpg


IMG_1808.jpg


IMG_1800.jpg


IMG_1798.jpg


IMG_1796.jpg


I made most of these welds with an old Lincoln AC only tombstone... Which actually welds fairly well, but the rough arc, hard starts and random arc-outtages make me miss the DC millers at school... I'm using 7018 mostly, at either 130 or 145 amps, with the occasional 6011 in there, and a bead or two from my Hobart 187 mig.

I'm still learning how to tack things in place, and then weld over the tacks so that the bead doesn't have a high spot where they were, and yes, that three bead weld is sideways, I did that in the flat position.

I'm open to all advice, and criticism... Thanks guys :)
 
Look to the left, there is a category called 3 point hitch specifications, follow the link to greater detail. Very nice work. You have it in you to be great!!!!!!. Jim
 
Make your tacks with the 6011 fairly hot. It'll make a concave tack that you can easily burn out as you weld over it.
 
Many years ago Dad had a three point carrier that was a little different from any I've seen since. Instead of having the two lower pins fixed on the frame, the frame had some loops. A regular drawbar, like the kind you see used between the lower arms, slide through the loops. The loops allowed for the bar to have about 4" of travel up and down, and the uprights limited the side to side travel to about an inch or so, so that it was very easy to hitch up. The 4" or so of "float" meant that it would always go down to the ground. Maybe someone here has a photo of one. I would buy another one like it in a minute, it really worked well.
The standard dimensions for category I and II are posted somewhere on this website.
One thing you might want to consider is to make your stuff compatible with quick hitches. I use a JD i-Match on my small tractor. Deere has been building their stuff so it is compatible with their quick hitches for years. A lot of other stuff, even though it might have the right dimensions for Category I, won't work because something is in the way of the quick hitch coming in from under and raising up to engage. Usually the top link hitch point is the problem. The ears for the top hitch are often welded on top - like you have done on your receiver hitches, so that the quick hitch hook can't get under it.
Making your stuff quick hitch compatible would give you a leg up on most of your competition.
 
You could try going to a farm euqipment dealer, & put your tape measure to work. Measure several peices of equipment, & average the numbers. I would stick with good brand names like John Deere, Land Pride, New Holland, etc. Be careful going to a place with questionable equipment such as TSC, or Rural King. I have done this a few times with remarkable results! Just not with a 3 pt. hitch.

Scotty
 
Lanse........them welds are lookin' SOOOooooo much better. I'm impressed.

You do know that there are several catagorys of 3-point hitches, don't you???

Howsomevers: Ford/Ferguson 9N set the CAT-1 standards for mountable implements. Other implement mfgs followed AFTER Ford's Patents ran out.

Ford's 9N 3-point specs: lower ball 8-1/2" above ground (I'd use 9", 'cuz you can lift the hydraulic arms but some implements you can't lift to align the pins) fitting a 7/8-dia 3"-long pin with 5/16" linch pin hole. Space between the balls is 26". You can also check them numbers by measuring the 11-hole drawbar. Its neat to beable to buy completed pins at the tractor parts store.

Toplink pin is 3/4" dia and originally 2-3/4" long. Use what ever fits yer up-right tube. (6" is available) ........HTH, Dell
 
As was said, 6011 are good for general tacking because they leave a concave or flat tack. They are also easy to restrike and you don't usually have to clean the slag off the tacks unless there's a a big blob of slag. For tacks that have to be twisted or hold a lot of stress 7018 should be used. Sometimes you can speed up just a little when going over larger tacks.

Your fitting looks excellent, everything looks nice and square. You might be burning too hot(145 is a little hot for 1/8" 7018) which is causing additional spatter. Your welds look pretty good with no undercut but there's a couple simple things you can do to make them look better. A DC machine would be huge advantage but you have what you have. You should you go backwards a little bit at the end of the welds to fill the crater in. A big concave crater, especially in a corner is good starting point for a crack to develop. On something you wanted real strong you could start at each end and leave the crater(s)in the middle of the weld. On a couple of your welds you missed the the very beginning. This could also be a starting point for cracks. The easiest way to solve this problem is to strike your arc ahead of the edge/beginning and once a steady arc is established, move the rod back to the front edge of the seam. It won't matter if there's an arc strike because you'll weld right over it 2 seconds later. For safety's sake don't be welding and especially don't do any grinding if there are any gas cans or equipment with a gas tank anywhere within 500 feet of you. This goes for any flammable materials. It looks like there's a snowblower, cardboard boxes and other easily ignited materials close to where you're working. One spark is all it takes.
 
i was just curious do you have to get special ac rods for the ac welders or will the dc rods work just the same.
RICK
 
just some tips from someone who has welded alot and build things from scratch. First like was already mention get the build weld area isolated,no cardboard fuel etc, second wear a fume mask under your hood and rig up ventilation arm to get those weld fumes out,or better yet invest in air powered weld helment,you can't beleive how these help,this is very important alot of fellows ignore this and in about 5 years time you will have really hard time breathing,have a terrible cough etc,not trying to scare yu here but have seen it happen time after time. I am sure even at this stage i bet you can tell you have been welding or not on a given day correct?Third like also was mention make them quick hitch usable,otherwise you will find it hard to compete with the mass produced cheap stuff good luck.
 
Get a good brand name cat. 2 quick hitch and use that as a jig to weld your implement hitches and include support stands to hold implements level so they can be hooked and unhooked easily. My 8ft. snow blower, 8ft. grader blade, and forklift all need support at the hitch to hook to the quick hitch. A cat 1 quick hitch could also be used as a jig. I will not consider a new implement that is not quick hitch compatable and has support stands! Same standards apply to front end loaders. Loaders and attatchments must have quick hitches wether Bobacat style or other brand name. Armand
 
It wasn't "Fords patents"....Harry Ferguson held the patent rights. (as he was the inventor of the three point hitch known as "The Ferguson System") Henry Ford and Harry Ferguson had a (somewhat shakey) "handshake agreement" as to the use of the patented hitch and it's use on the N series Fords. Once Fords son took over the "family business", he weaseled out of honoring the agreement. Ferguson sued (and won) but before the court settled the suit, the patents had run out.

Ferguson's hitch appeared on prototype tractors as early as 1929, and was a standard feature on the Ferguson-Brown tractor quite some time before it showed up on the 9N.

It can be argued that Ferguson wouldn't have become "the name" in the tractor industry, as well as the N series Ford wouldn't have sold very well at all without Fergusons hitch.
 
I see you are on the west side of Columbus. What are you getting for the carry-alls and three point drawbar mounts?

Thanks

Aaron
 
ASAE (American Society of Agricultural Engineers) set the standards for various catagories of 3-point hitches. SOME of the newer import brands will deviate slightly from those standards.
Hitch measurements
 
Looks like nice work, Lance. Top picture, on my commercially made unit, the lower pins are attached to tabs welded to uprights. They are 12 inches off the ground. (Note that TSC"s newest version has the pins attached directly to the upright members.) Center link is also tabs about 6 inches long, and center pin would be 29 inches above the ground.
TSCs current model
 
Kind of... There are rods that will run on AC/DC and just on DC. To my knowledge, there are no rods that just run on AC only, but there might be some for exotic metals, etc out there. They must not be very common though.

Of the AC/DC rods, all will run smoother on DC, and get more penetration with a nicer arc, less splatter, easier starts, and no arc-outtages.

6010 is a deep digging electrode that burns through a lot of paint/rust/etc, but only runs on DC.

6011 is the AC version of 6010, same rod but with arc stabilizers for AC current. It doesn't get quite as much penetration, and runs a little differently, and can also be used on DC.

7018 can be run on AC or DC, but I'm told that theres a 7018AC version, that runs better on AC than regular 7018. I have never used that, though...

Most other DC rods (6013, 7014, etc) will also run on AC. I hope that this answers your question...
 
Hey, I really like the way that they fit theirs up... Thats a good idea...

I'm trying to decide where I'll mount the pins... I think that i'll just cut off the threaded part, and weld them straight to the upright members... Not drilling a big hole should save me some torch gas, and keep these things from being weakened, plus save some time. I might go with the tabs, but that would cost time and metal. Decisions, decisions :)

Thanks for the advice...
 
I'm planning on picking up a fume mask for under my hood...

I can't tell that I've been welding, but I still must breathe in a lot of crap... Chop saw dust being the worst... Someone built the garage i work in so that the two big doors face the wind directly, and when I open up the windows in the back of the garage, I get a wind tunnel effect going in no time.

Thanks for the heads up...
 
Just drill them and bolt them. If you"re concerned about strength, weld a backing plate over the area, and bolt thru both upright and plate.
 
Picture shows three point dimensions from tractor operator's manual. Height of top link attachment point can be variable from implement to implement. I measured two implements that I own. Both were 18 inches centerline of lower pins to center of top pin hole.
a33727.jpg
 
Lanse,

My 3pth machines all have their lower pins about 6 to 12 inches from the ground... if i adjust the lift arms on my tractors, they can drop the ball ends to the ground, but then they don't lift as high. If i need too, i put my smaller machine on pallets so the lift pins are higher off the ground. I figure 8-10 inches would be about right from ground to lower lift pin. Hope that helps some...

nice looking stuff there...
 
(quoted from post at 15:33:44 03/06/11) Kind of... There are rods that will run on AC/DC and just on DC. To my knowledge, there are no rods that just run on AC only, but there might be some for exotic metals, etc out there. They must not be very common though.

Of the AC/DC rods, all will run smoother on DC, and get more penetration with a nicer arc, less splatter, easier starts, and no arc-outtages.

6010 is a deep digging electrode that burns through a lot of paint/rust/etc, but only runs on DC.

6011 is the AC version of 6010, same rod but with arc stabilizers for AC current. It doesn't get quite as much penetration, and runs a little differently, and can also be used on DC.

7018 can be run on AC or DC, but I'm told that theres a 7018AC version, that runs better on AC than regular 7018. I have never used that, though...

Most other DC rods (6013, 7014, etc) will also run on AC. I hope that this answers your question...

Lanse nice to see you posting again. Very good explanation on the welding rods. As you clearly pointed out 6010 is really the only common rod that can not be run with AC power and 6011 is the suitable AC substitute for 6010. If you master good welds with the AC handicap then from everything I hear then you will find DC a breeze as it is supposedly much easier. (I only have AC-225 power too, but I am a total hack of a welder. My welds are ugly but they do not fail. I would be proud if my welds looked as good as yours).

The 7018AC versions are the best choice for the AC buzzboxes but really are the best choice for any of the smaller buzz-box type welders even if it has DC capability (e.g. Lincoln AC225/DC125, Hobart Stickmate 235AC/160DC, or any of the cheapie grade of DC only Inverter based welders). Many welders run the 7018AC version in DC mode on their buzzboxes simply for the slightly easier restrikes - buzzboxes typically have lower OCV voltages as compared to bigger industrial rated welders. That said, I do not fool with any 7018 simply due to the rod oven storage requirements of it or alternatively my projects are never large enough to justify going and buying a brand new sealed box of rod each time I want to weld and then discarding what I do not use so I do not fool with any version of 7018.
 
(quoted from post at 15:37:32 03/06/11) ... Not drilling a big hole should save me some torch gas...

I do not have a torch as it costs too much to lease the bottles and refill the tanks so my Lincoln AC-225 becomes more of a tool for me than just a welder alone:

In lieu of a torch it is possible to crank the welder up and use 6011 rods to cut steel and to burn holes in steel. The Lincoln manual even shows a recommended sawing technique on how to do this. Some people claim soaking the 6011 rod in water helps when cutting although I have never soaked my rods when cutting or burning holes. Savey users can cut/burn holes such that almost zero grinding is required. Less savey users (like me) have to do a little grinding but it does work. I have an uncle that claims he can cut thinner sheet stock that requires no grinding(almost as good as plasma) by incorpoarting a straight edge and other techniques - I need to get him to teach me his tricks on this.

I also use my AC225 to heat metal with a Twin Carbon arc torch (NOT to be confused with carbon gouging or Arcair gouging which is totally different process). The Twin carbon arc torch will NOT cut metal but can be used to heat metal for bending/straightening, removing rusted nuts with or without flame, and to braze or silver solder. Savey user's can even improvise tig weld with one (I can NOT). My flames are more similar to oxy/acetylene with a rosebud tip, but I do not practice to attempt to make alternatively better flames either. Twin Carbon Arc can actually burn 1000 degrees hotter than oxy/acetylene's potential if desired. Buying electricity is still cheap comapered to buying gas for the infrequent user. FWIW Twin carbon arc is the one process where AC power actually works better than DC power. The two rods burn/consume evenly on AC power. DC power can be used too, but one rod will burn/consume twice as fast as the other one making it a little harder to maintain the ideal flame.
 
Unless your building pressure vessels, or similar critical, work 7018 don't require an oven. As long as they are kept dry and away from moisture they will work just fine. The resealable plastic rod containers work well for keeping rods dry.
 
(quoted from post at 19:45:35 03/06/11) Unless your building pressure vessels, or similar critical, work 7018 don't require an oven. As long as they are kept dry and away from moisture they will work just fine. The resealable plastic rod containers work well for keeping rods dry.

I am not an expert welder and a self-admitted welding hack. That said, improperly stored 7018 can still lay a beautiful weld bead that is really only good in appearance only. Unfortunately that 7018 that has only been stored in a plastic rod container might be so full of hydrogen embrittlement that it is not very strong at all even though it looks excellent in appearance. Hence, I will continue utilizing rod types that I know moisture does not have such an adversere effect on as I struggle enough with welding as it is. If my ugly welds with 6011, 6013, or 7014 start failing then I might reconsider switching rods, but until then no 7018 for me.
 
I use tabs.The short pieces are easy to clamp in the drill press.Straight welds are easy to do.welding around a pin takes skill.
 
Nice welding job. The CRITICAL dimension is the one from the center of the lower pins to the center of the top hole for the top link. Too much and the load on the forks slide off. To little and the forks wind up sticking up in the air. finally found it
http://www.tractorsmart.com/main/Tractor%20Three%20Point%20Lift%20Types.htm
Category O is 11 3/8"
Cat 1 dimensions
 
I keep 7018 in the attic over the kitchen plenty hot all summer.A plastic tube will keep them dry.No need to toss unused 7018 for the type of welding I do.I found 45 lb of 7018 in road side trash.Welds fine.
 
Try different brands of welding rod and watch the price of steel close.A big increase in steel costs can eat up profits.
 
That look like a plow hitch.My hitch pins are at the same height on my cord wood saw,carry all,cultivator ,sprayer and post hole drill.
 
Nice job on the welding, Lanse. You've gotten some very good suggestions here. Burning rods will help smooth out your stops and starts. One suggestion I might make is to put a radius on the sharp corners, either with a torch or grinder. Attention to detail will give you a leg up on your competition. Keep up the good work, young man.
C. L.
 
The rods don't pick up hydrogen embrittlement from sitting. The welds get hydrogen embrittlement in the molten state if there is too much moisture in the coating. If the rods are kept in a sealed container at room temperature, they will be fine 95% of the time. You could always warm the rods a little before using them. Someone suggested putting them in a portable BBQ to warm them up and some guys just stick the rod to the work for a few seconds to dry any moisture. If the rods have been soaked, then they need to baked at high temperature for several hours. Most people would throw out rods that got wet though. If the projects you're doing can be done successfully with 7014 and especially 6013, they are not in the category of critical welds. Wet 7018 will weld very poorly and usually have porosity. Lanse's 7018 looks just fine except for the stops and starts and that just takes a little more practice to perfect.
 

We sell tractor parts! We have the parts you need to repair your tractor - the right parts. Our low prices and years of research make us your best choice when you need parts. Shop Online Today.

Back
Top